Disclaimer: This article is translated by DeepL, the original post was published at Amazon Web Service Chinese Official Blog.
This is a quick primer on using JuiceFS as an Amazon EMR storage backend, a POSIX-compatible shared file system designed to work in the cloud and be HDFS-compatible. JuiceFS offers 50% to 70% cost savings compared to a self-built HDFS, while achieving performance close to that of a self-built HDFS.
Why use JuiceFS in Amazon EMR?
Using HDFS in a Hadoop cluster is a storage-compute coupled architecture where each node in the cluster has both compute and storage responsibilities. In real business scenarios, the growth of data volume is usually much faster than the growth of compute demand, but in the Hadoop storage-compute coupled architecture, the expansion must require both storage and compute expansion, which naturally brings the low utilization of compute resources. With the increase of storage size, the load pressure on HDFS becomes higher and higher, but it does not support horizontal scaling, which brings high complexity to operation and maintenance, and problems such as NameNode restart and Full GC can bring unavailability to the whole cluster for tens of minutes to hours, affecting business health.
If you change Hadoop storage from HDFS to Amazon S3, you have to solve the differences in compatibility, consistency, performance, permission management, etc. In terms of compatibility, users who want to use EMR without a built-in compute engine may have to solve the driver adaptation problem by themselves; performance degradation may have to expand the cluster size; changes in permission management may have to rebuild the entire ACL system.
JuiceFS is such a low-cost, elastic and scalable fully managed HDFS service. JuiceFS brings customers the same compatibility, consistency and close performance as HDFS, and the same fully managed, elastic and scalable low cost as Amazon S3.
What is JuiceFS?
JuiceFS is a distributed file system designed for cloud-native environments, fully compatible with POSIX and HDFS, suitable for big data, machine learning training, Kubernetes shared storage, and massive data archive management scenarios. It supports all global public cloud providers and provides fully managed services, so customers can instantly have an elastic and scalable file system with up to 100PB capacity without investing any operation and maintenance efforts.
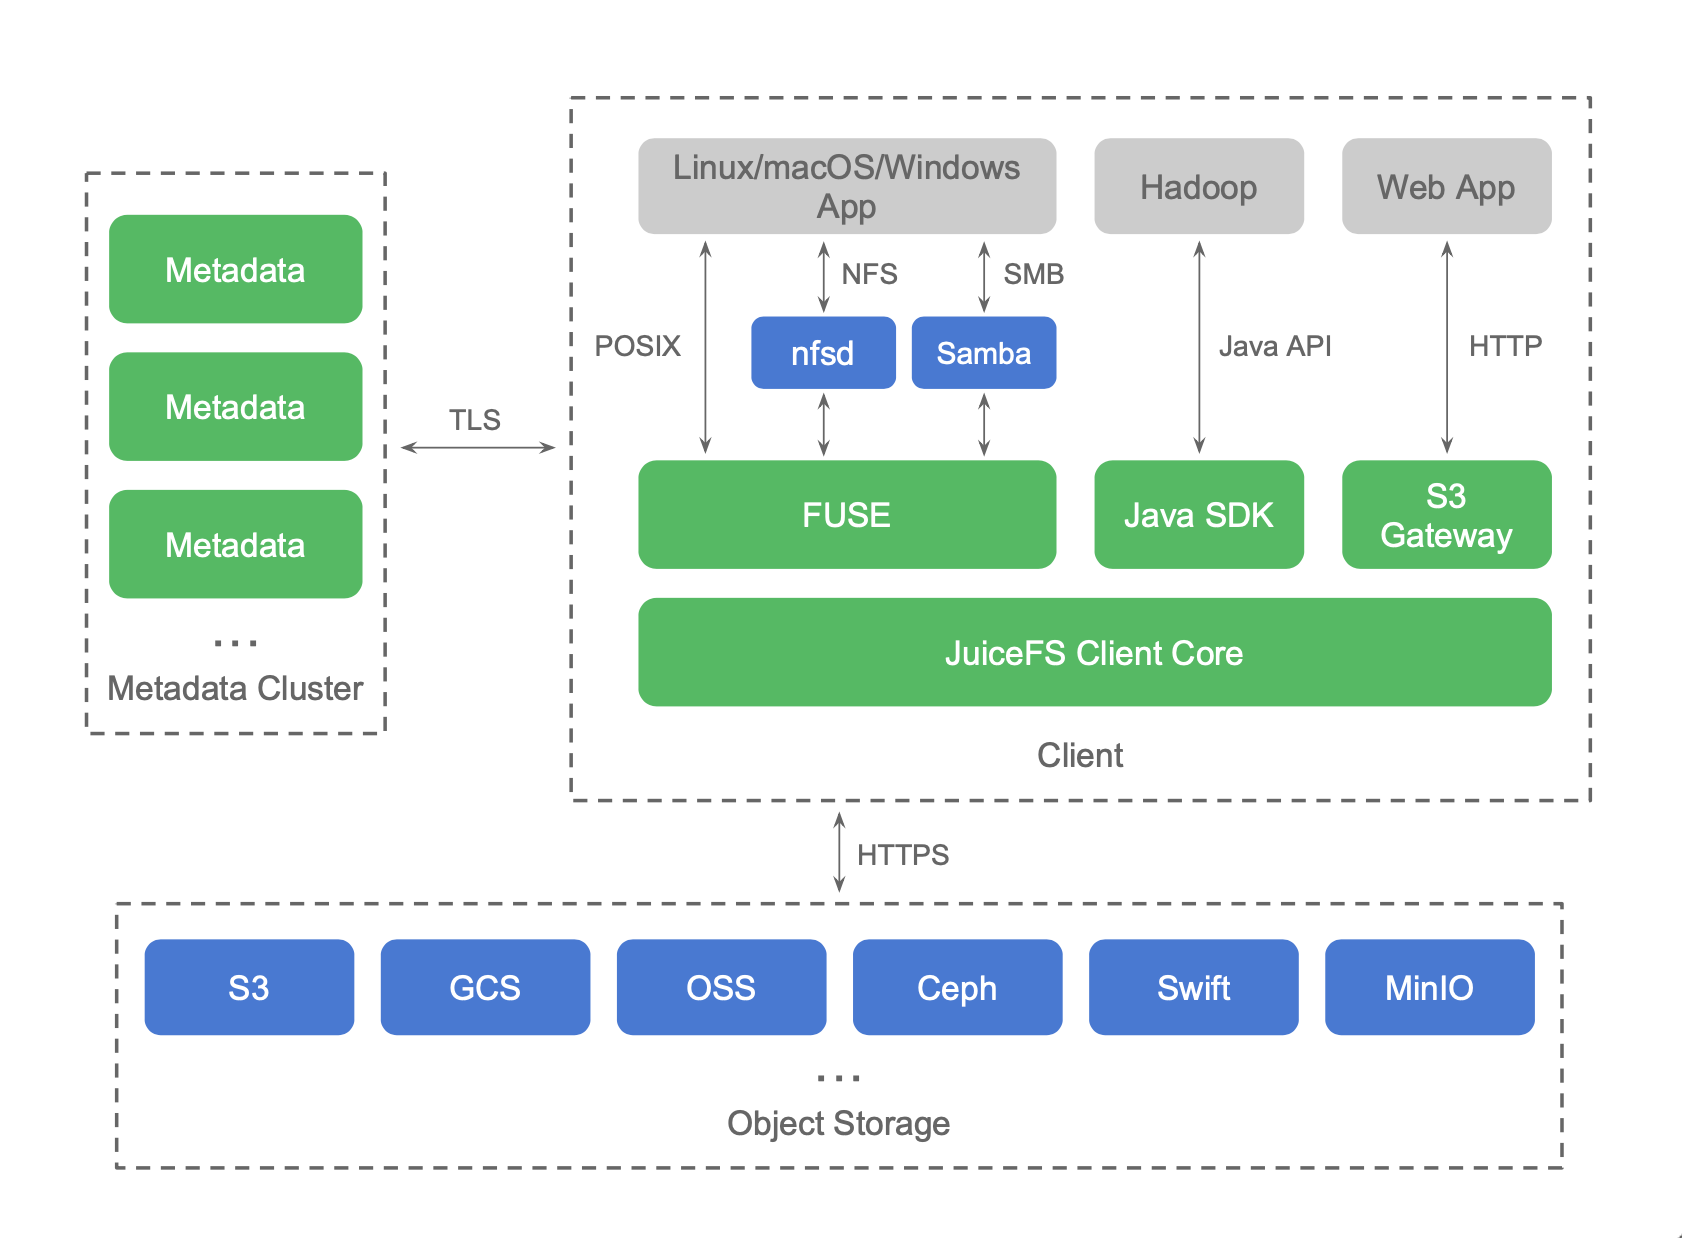
As you can see in the architecture diagram below, JuiceFS already supports various public cloud object stores as back-end data persistence services, and also supports open source object stores such as Ceph, MinIO, Swift, etc. FUSE clients are provided on Linux and macOS, and native clients are provided on Windows systems, both of which can mount the JuiceFS file system to the system, making the experience exactly the same as a local disk. The Java SDK is available in Hadoop environments and the experience is the same as HDFS. JuiceFS' metadata services are deployed as a fully managed service on all public clouds, so customers don't have to maintain any services themselves and the learning and usage barriers are extremely low.
Performance Tests
Comprehensive Performance
TPC-DS is published by the Transaction Performance Management Committee (TPC), the most well-known standardization organization for benchmarking data management systems. TPC-DS uses a multidimensional data model such as star and snowflake. It contains 7 fact tables and 17 dimension tables with an average of 18 columns per table. Its workload contains 99 SQL queries covering the core parts of SQL99 and 2003 as well as OLAP. this test set contains complex applications such as statistics on large data sets, report generation, online query, data mining, etc. The data and values used for testing are skewed and consistent with the real data. It can be said that TPC-DS is a test set that is very close to the real scenario and is also a difficult test set.
Test environment
- Ningxia (cn-northwest-1) region
- 1 Master m5.2xlarge 8 vCore, 32 GiB memory, 128 GB EBS storage
- 3 Core m5d.4xlarge 16 vCore, 64 GiB memory, 600 SSD GB storage
- emr-6.1.0 Hive 3.1.2, Spark 3.0.0, Tez 0.9.2
- juicefs-hadoop-1.0-beta.jar
- JuiceFS Professional Trial Version
- Tested with 500GB TPC-DS dataset.
JuiceFS parameters
juicefs.cache-dir=/mnt*/jfsjuicefs.cache-size=10240Mjuicefs.cache-full-block=false
Results of Hive tests
Since the complete test is quite long, we have selected a partial test set as a reference. Each test script is executed 2 times and the average of the two times is taken as the test result. The shorter the test time is, the better the result is. The left graph shows the absolute time spent for each test script. The right graph shows the relative time based on S3.
Total time overhead for Hive on Parquet tests:
- JuiceFS 685.34 seconds
- HDFS 615.31 seconds
- S3 1887.99 seconds
JuiceFS is 175% faster than S3 and 11% slower than HDFS.
Total time overhead for Hive on ORC testing:
- JuiceFS 789.58 seconds
- HDFS 695.25 seconds
- S3 1796.34 seconds
JuiceFS is 127% faster than S3 and 13% slower than HDFS.
Write Performance
We did a data write test with Spark, writing 143.2 GB of data in text (unpartitioned) format with the following SQL statements.
CREATE TABLE catalog_sales2 AS SELECT * FROM catalog_sales;
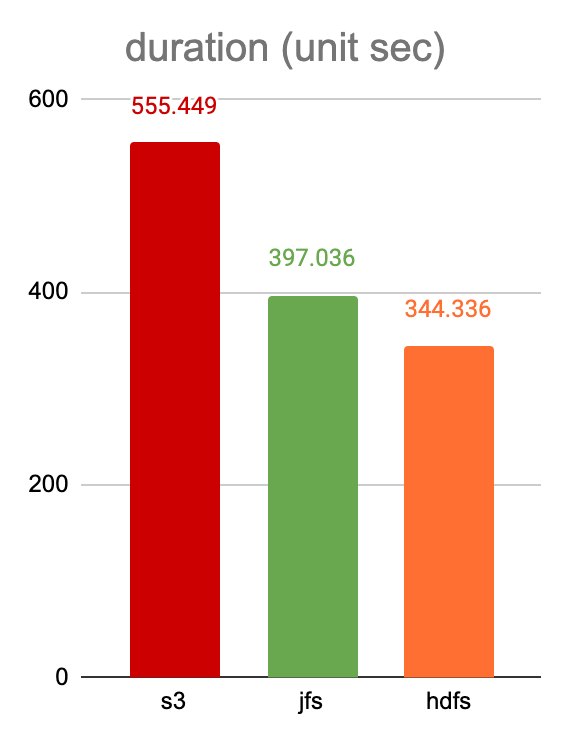
The solution developed by Juicedata in conjunction with Amazon Cloud Technologies automatically configures the available JuiceFS environment in Amazon EMR via the AWS CloudFormation template and provides a TPC-DS Benchmark test program for use. The results of the above tests were built using this solution.
How to Quickly Use JuiceFS in Amazon EMR with AWS CloudFormation
Github source code
https://github.com/aws-samples/amazon-emr-with-juicefs/
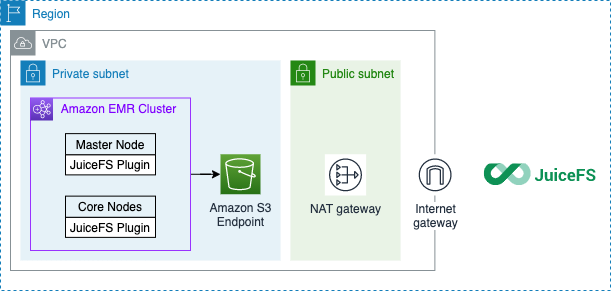
Architecture diagram
Note:
- The EMR cluster needs to be connected to the JuiceFS metadata service. It needs a NAT gateway to access the public Internet.
- Each node of the EMR cluster needs to install the JuiceFS Hadoop extension JAR package to use JuiceFS as the storage backend.
- JuiceFS only stores metadata, the raw data is still stored in your account S3.
Deployment Guide
Prerequisites
- Register a JuiceFS account
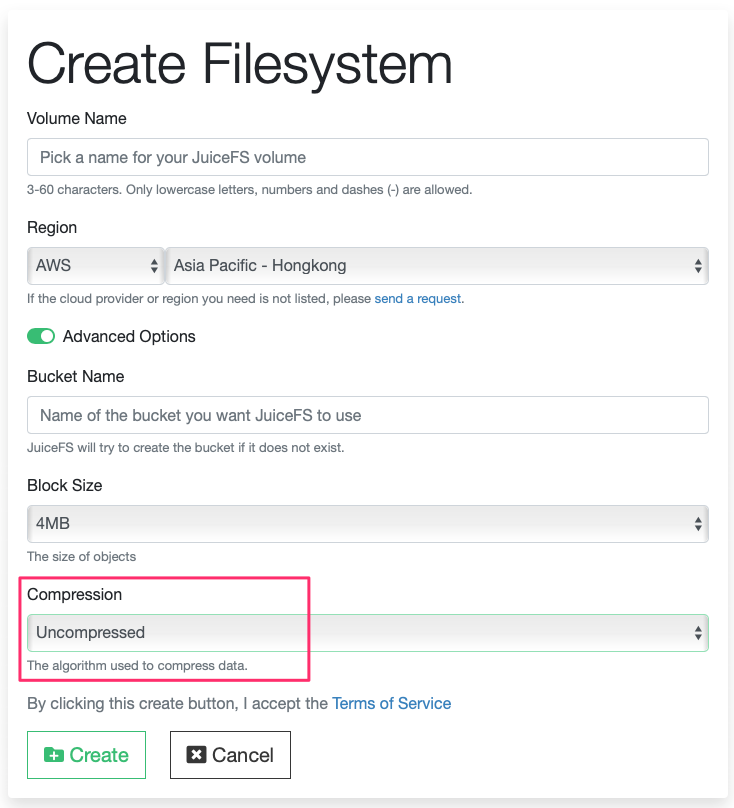
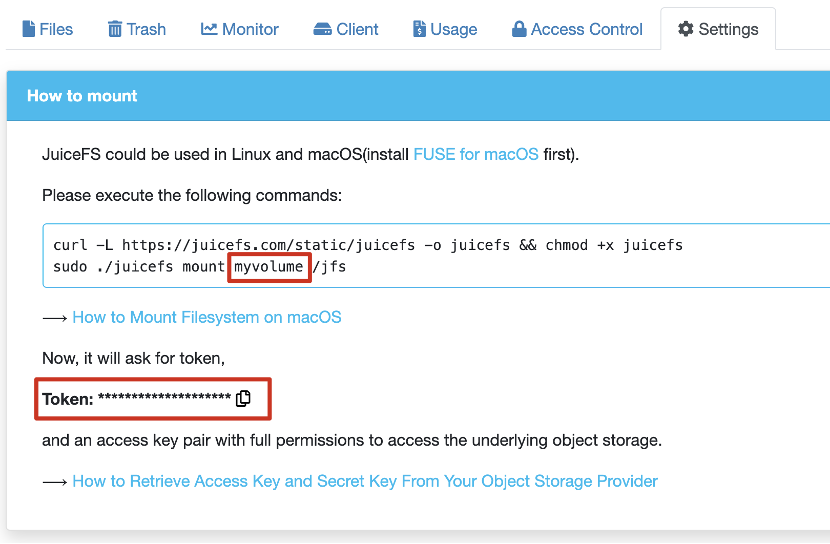
- Create a volume in the JuiceFS console. Select your AWS account region and create a new volume. Please change the "Compressed" item in the Advanced Options to Uncompressed
Note: JuiceFS file system enables LZ4 algorithm for data compression by default. In big data analysis scenarios, ORC or Parquet file formats are often used, and only a part of the file needs to be read during the query process. If compression is enabled, the complete block must be read and decompressed to get the needed part, which will cause read amplification. If compression is turned off, you can read part of the data directly.
- Get the access token and bucket name from the JuiceFS console.
Start AWS CloudFormation Stack
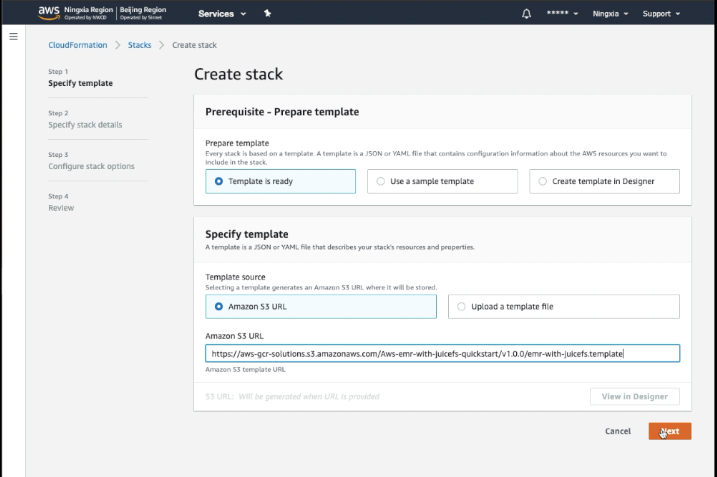
- Fill in the configuration items
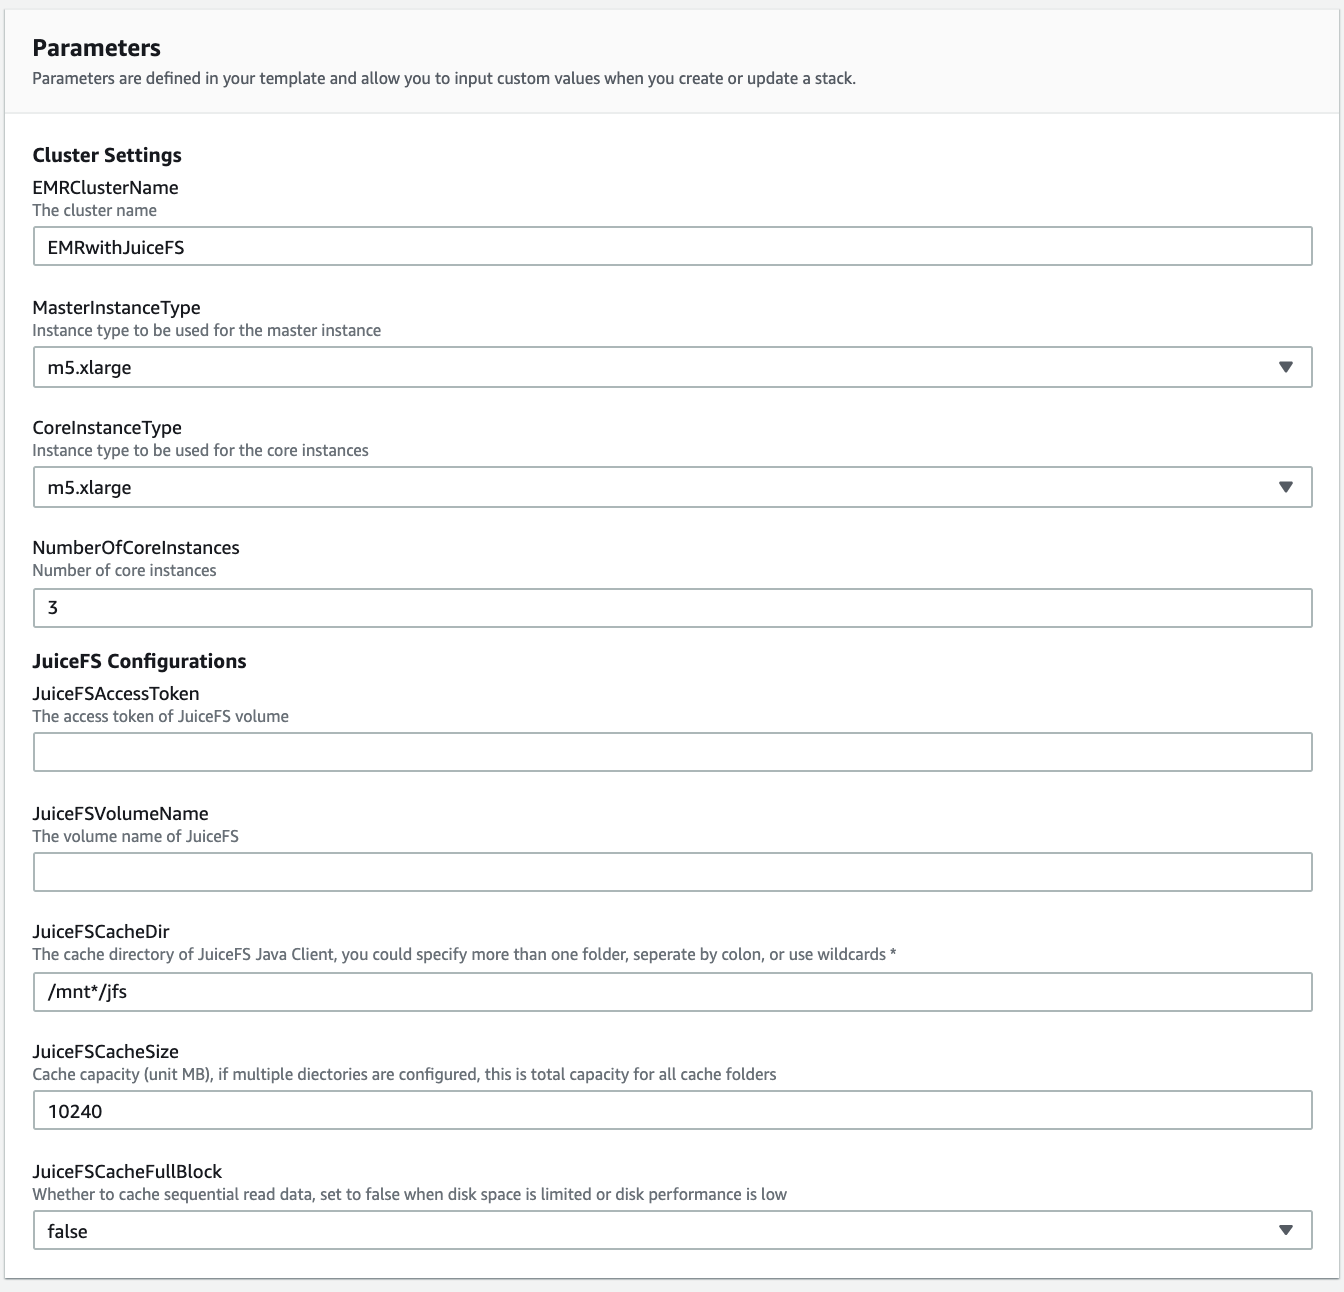
Parameter Description
| Parameter Name | Explanation |
|---|---|
| EMRClusterName | EMR cluster name |
| MasterInstanceType | master instance type |
| CoreInstanceType | Core node type |
| NumberOfCoreInstances | Number of core nodes |
| JuiceFSAccessToken | JuiceFS access token |
| JuiceFSVolumeName | JuiceFS storage volume name |
| JuiceFSCacheDir | Local cache directory, you can specify multiple folders, separated by a colon, or use wildcards (e.g. *) |
| JuiceFSCacheSize | The size of the disk cache, in MB. If multiple directories are configured, this is the sum of all cache directories. |
| JuiceFSCacheFullBlock | Whether to cache sequential reads, set to false if disk space is limited or disk performance is low |
You can check your cluster in the EMR service after starting CloudFormation Stack and completing the deployment.

Go to the Hardware tab.

Find your Master node.

Connect to the master node via AWS Systems Manager Session Manager.

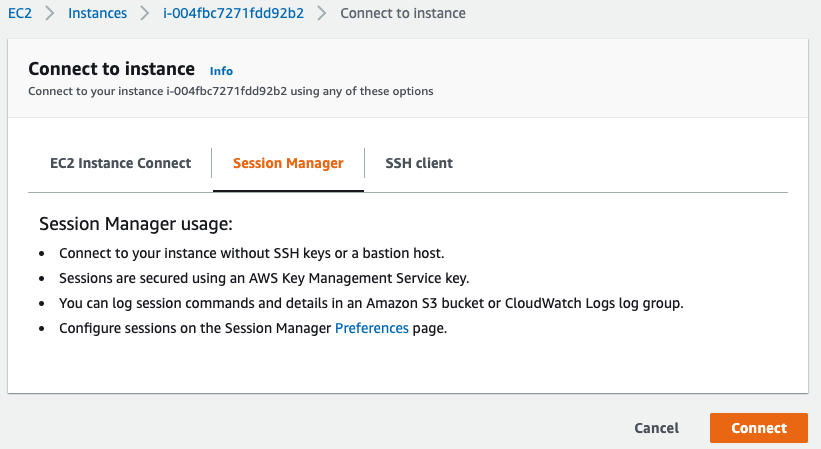
Log in to the Master node.

Next, verify the cluster environment.
$ sudo su hadoop
# JFS_VOL is a prefabricated environment variable that points to the JuiceFS storage volume you are on
$ hadoop fs -ls jfs://${JFS_VOL}/ # Don't forget the last "slash"
$ hadoop fs -mkdir jfs://${JFS_VOL}/hello-world
$ hadoop fs -ls jfs://${JFS_VOL}/
Run TPC-DS benchmark tests
- Log in to the cluster master node via AWS Systems Manager Session Manager, then change the current user to hadoop.
$ sudo su hadoop
- Unzip benchmark-sample.zip.
$ cd && unzip benchmark-sample.zip
- Run the TPC-DS test.
$ cd benchmark-sample
$ screen -L

# . /emr-benchmark.py is the benchmark test program
# It will generate the test data for the TPC-DS benchmark and execute the test set (from q1.sql to q10.sql)
# The test will contain the following parts.
# 1. generating the TXT test data
# 2. convert the TXT data to Parquet format
# 3. convert the TXT data to Orc format
# 4. executing the Sql test cases and counting the time spent in Parquet and Orc formats

# Supported parameters
# --engine Choose hive or spark as the computation engine
# --show-plot-only shows histograms in the console
# --cleanup, --no-cleanup Whether to clear benchmark data on every test, default: no
# --gendata, --no-dendata Whether to generate data on every test, default: yes
# --restore Restore the database from existing data, this option needs to be turned on after --gendata
# --scale data set size (e.g., 100 for 100GB of data)
# --jfs turns on uiceFS benchmark testing
# --s3 turns on S3 benchmark testing
# --hdfs turns on the HDFS benchmark test

# Make sure the model has enough space to store test data, e.g. 500GB Recommend Core Node to use m5d.4xlarge or above
# Please refer to https://docs.aws.amazon.com/emr/latest/ManagementGuide/emr-plan-storage.html for model storage options
$ . /emr-benchmark.py --scale 500 --engine hive --jfs --hdfs --s3 --no-cleanup --gendata
Enter your S3 bucket name for benchmark. will create it if it doesn't exist: (please enter the name of the bucket used to store the s3 benchmark, if it doesn't exist then a new one will be created) xxxx

$ cat tpcds-setup-500-duration.2021-01-01_00-00-00.res # test results
$ cat hive-parquet-500-benchmark.2021-01-01_00-00-00.res # Test results
$ cat hive-orc-500-benchmark.2021-01-01_00-00-00.res # Test results

# Delete data
$ hadoop fs -rm -r -f jfs://$JFS_VOL/tmp
$ hadoop fs -rm -r -f s3://<your-s3-bucketname-for-benchmark>/tmp
$ hadoop fs -rm -r -f "hdfs://$(hostname)/tmp/tpcds*"
- Note: AWS Systems Manager Session Manager may time out and cause the terminal to disconnect. It is recommended to use the
screen -Lcommand to tell the session to remain in the background. - Note: If the test machine has more than 10vcpu in total, you need to open JuiceFS Professional trial, for example: you may encounter the following error juicefs[1234]
: register error: Too many connections - Sample output
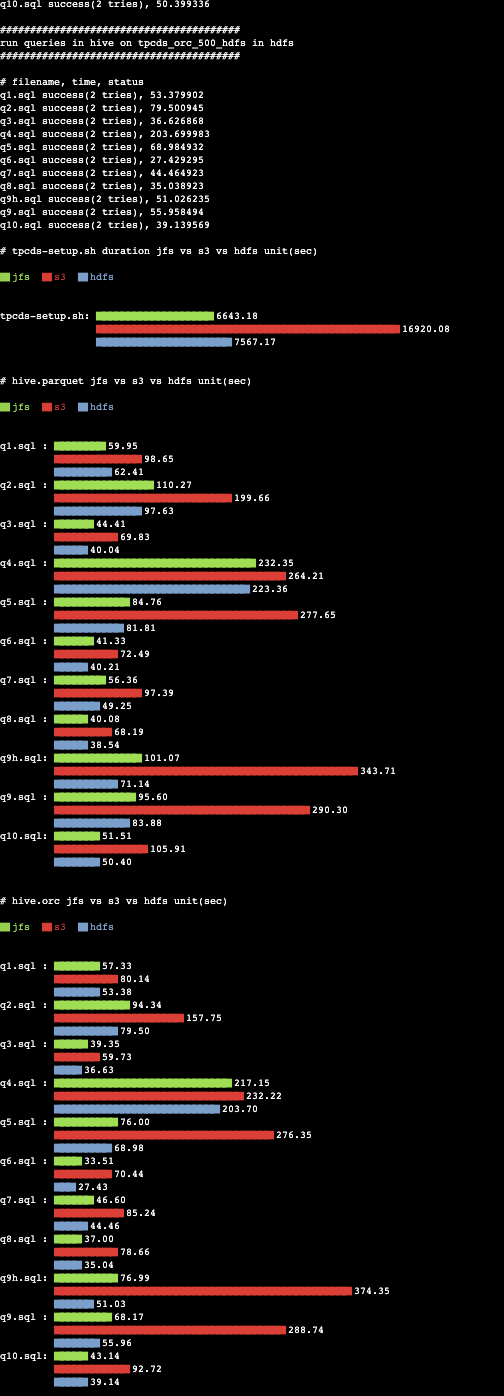
- Delete Stack

Conclusion
The test verification shows that JuiceFS is indeed an elastic and scalable fully managed HDFS service. It brings customers the same compatibility, consistency, and close performance as HDFS, and the same fully managed, elastic scaling, and low cost as Amazon S3.


