Data Encryption
JuiceFS provides data encryption from two aspects:
- Data Encryption In Transit
- Data Encryption At Rest
Data Encryption In Transit
Running JuiceFS generally involves the network connection between database and object storage, which is determined by the architecture of JuiceFS. As long as the servers support encryption connections, JuiceFS can be accessed through the encrypted channel.
Connect to object storage via HTTPS
Public cloud object storage generally supports both HTTP and HTTPS. If no scheme is specified, JuiceFS uses HTTPS by default. For example, the client will identify the bucket in following command as https://myjfs.s3.ap-southeast-1.amazonaws.com.
juicefs format --storage s3 \
  --bucket myjfs.s3.ap-southeast-1.amazonaws.com \
  ...
With the above command, the client will recognize the bucket as https://myjfs.s3.ap-southeast-1.amazonaws.com.
In the case where server and object storage run on the same VPC network, explicitly set the URL scheme to http if you don't need an encrypted connection, e.g., --bucket http://myjfs.s3.ap-southeast-1.amazonaws.com.
Connect to database via TLS/SSL
For all the supported metadata engines, as long as the database supports encryption and has been configured with encryption such as TLS/SSL, JuiceFS can connect to the database through its encrypted channel. For instance, a Redis database configured with TLS can use rediss:// for connecting.
juicefs format --storage s3 \
  --bucket myjfs.s3.ap-southeast-1.amazonaws.com \
  "rediss://myredis.ap-southeast-1.amazonaws.com:6379/1" myjfs
Data Encryption At Rest
JuiceFS provides Data Encryption At Rest support, which encrypts first, then uploads. All files stored in JuiceFS will be encrypted locally and then uploaded to object storage, effectively preventing data leakage when the object storage itself is compromised.
JuiceFS Data Encryption At Rest adopts a hybrid encryption architecture: symmetric encryption handles data encryption, while asymmetric encryption handles key protection. You only need to provide an private key when creating the file system to enable data encryption functionality, and provide the private key password through the JFS_RSA_PASSPHRASE environment variable. In usage, the mount point is completely transparent to applications, meaning the encryption and decryption processes will not affect file system access.
The cached data on the client-side is NOT encrypted. Only the root user or owner can access this data. To encrypt the cached data, you can put the cached directory in an encrypted file system or block storage.
Encryption Principles
Encryption Architecture Design
JuiceFS adopts a hybrid encryption architecture with two encryption layers:
-
Data Encryption Layer (Symmetric Encryption - AES-256-GCM or ChaCha20-Poly1305 or SM4-GCM)
- Purpose: Actually encrypts user data content
- Mechanism: Each block generates a unique symmetric key
S+ random seedN(both use 256-bit keys) - Advantage: Both AES-256-GCM and ChaCha20-Poly1305 provide high-speed encryption and integrity verification (AEAD)
- Standard: 256-bit key strength complies with NIST security standards, ChaCha20-Poly1305 is an RFC 8439 standard algorithm
-
Key Protection Layer (Asymmetric Encryption)
- Purpose: Protects the secure distribution and storage of symmetric keys
- Mechanism: Uses private key
Mto encrypt each data block's symmetric keyS - Advantage: Solves key distribution challenges and avoids key reuse risks
- Scheme: Supports private keys in PKCS#1 or PKCS#8 formats.
Users need to create a global private key M for the file system in advance. Each object stored in the object storage will have its own random symmetric key S.
Symbol explanation:
Mrepresents private key created by userSrepresents 256-bit symmetric key generated by the JuiceFS for each file objectNrepresents random seed generated by the JuiceFS for each file objectKrepresents the cipher text ofSencrypted with private keyM
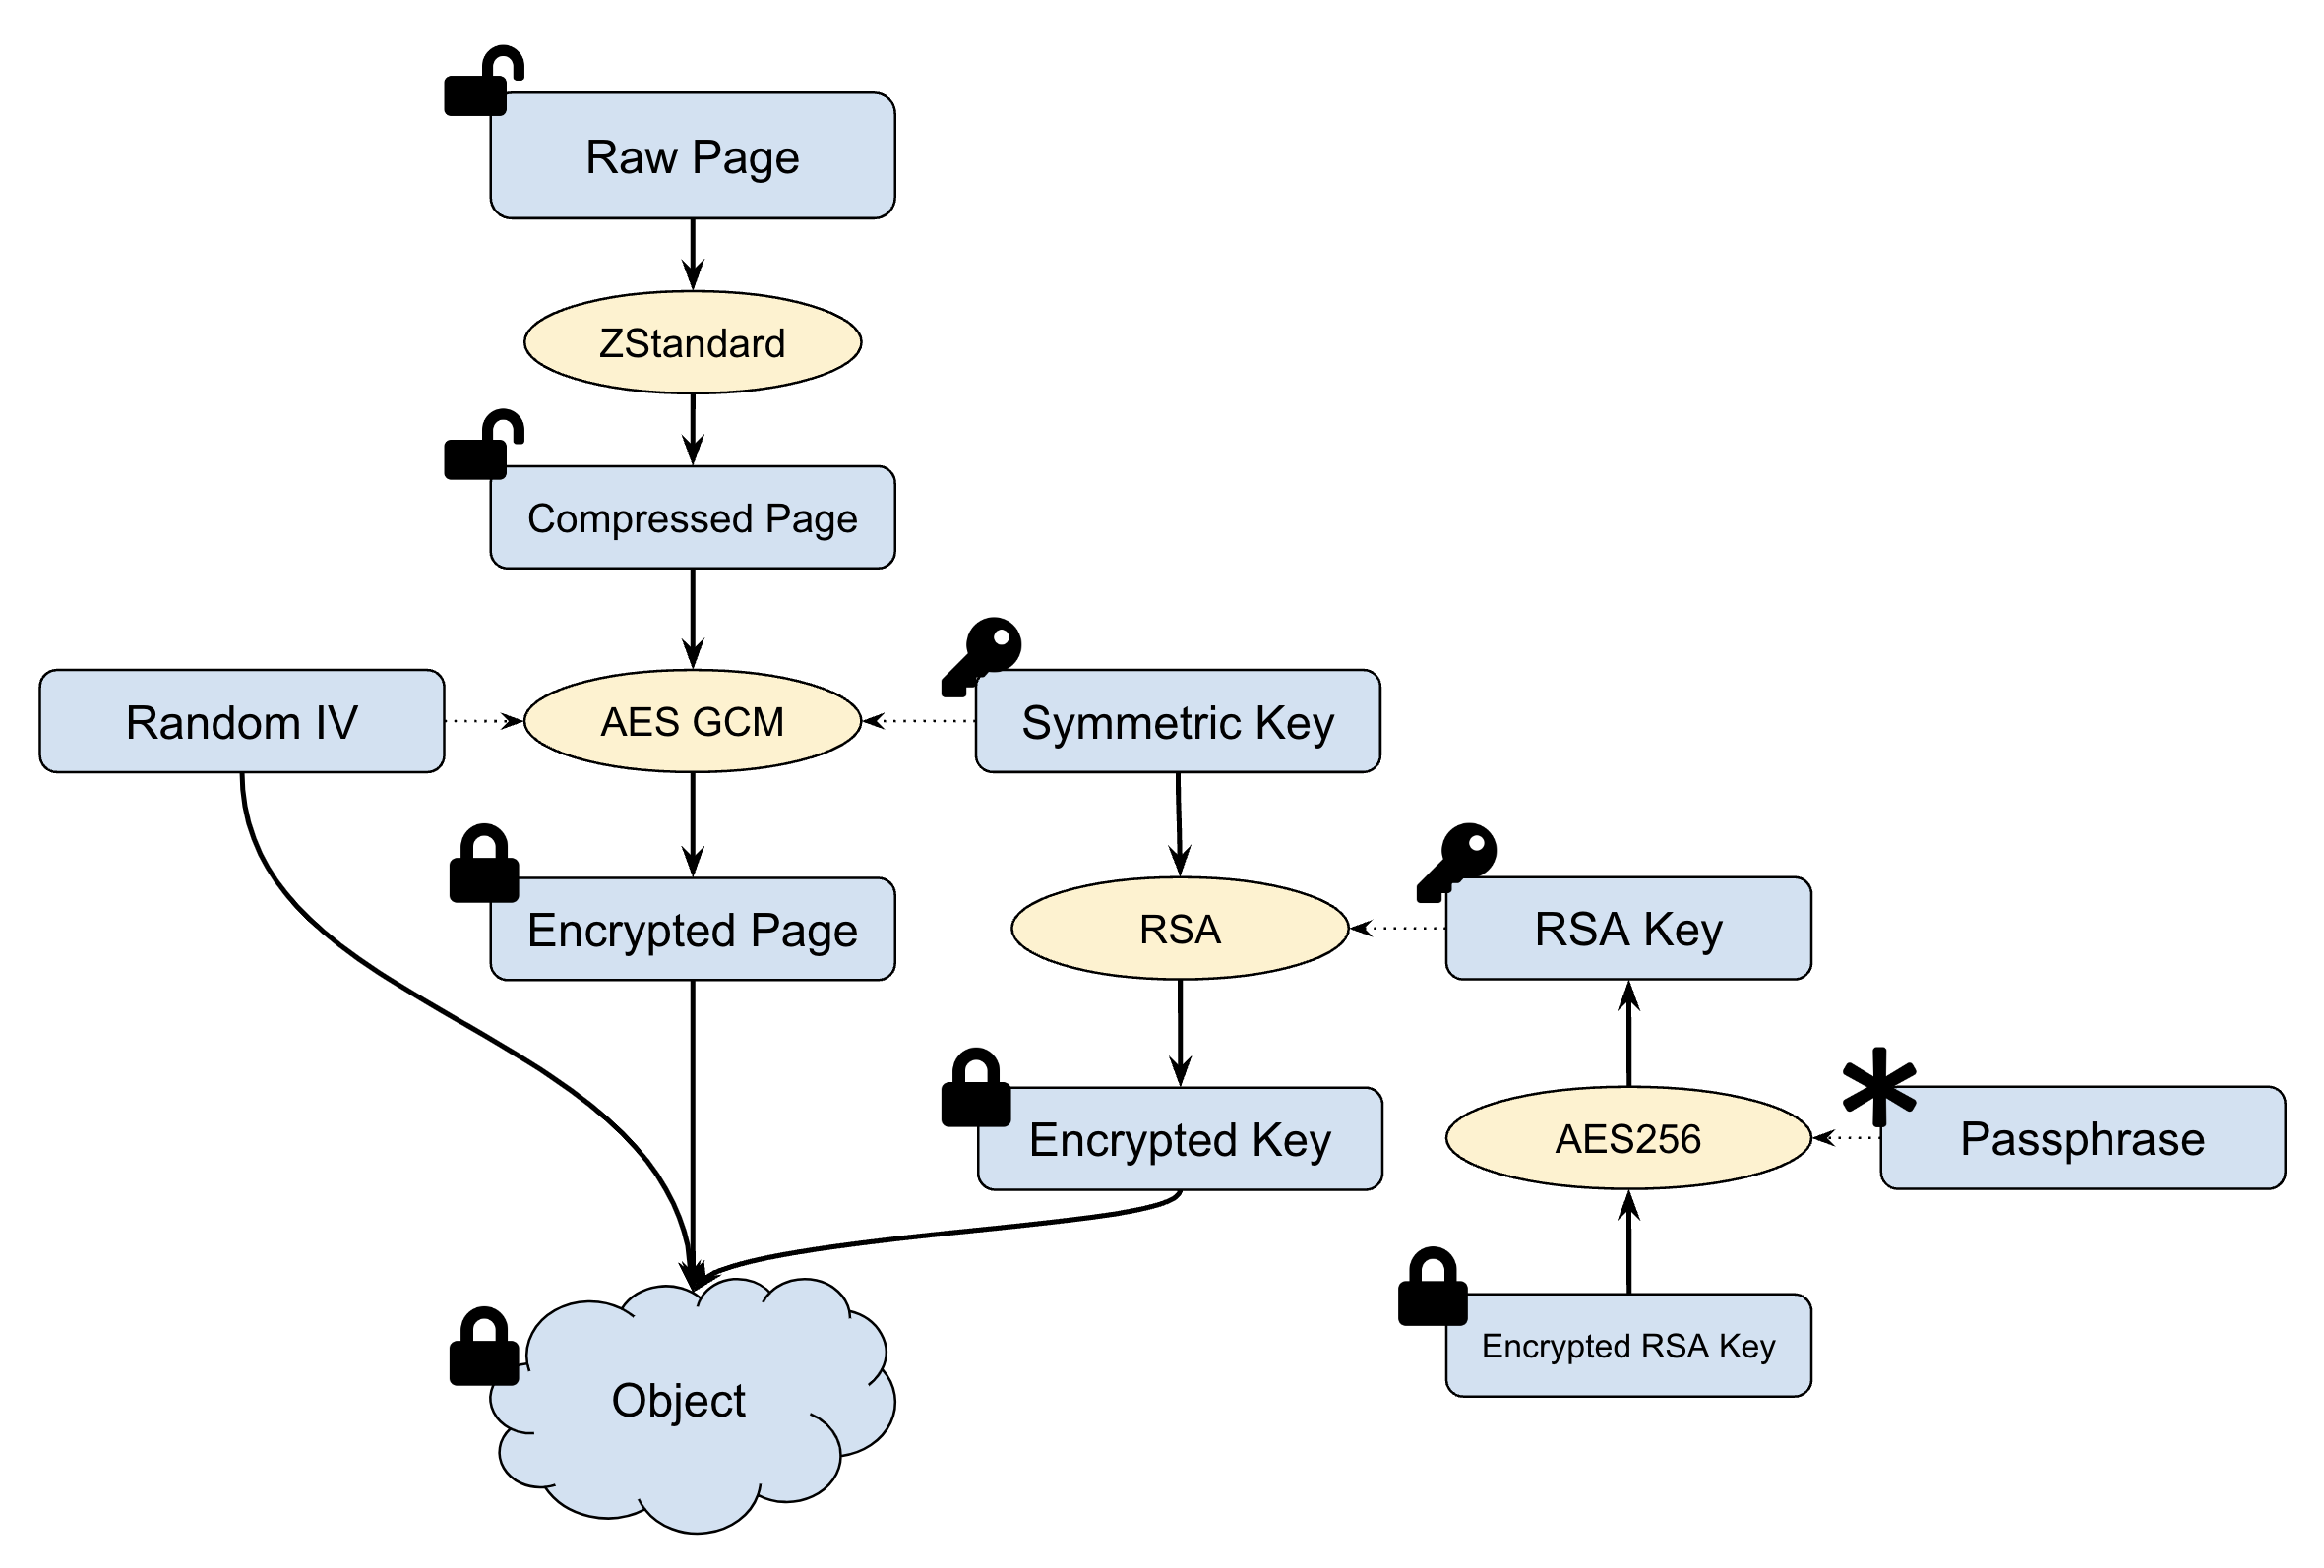
Data Encryption Process
- Before writing to object storage, data blocks are compressed using LZ4 or Zstandard.
- A random 256-bit symmetric key
Sand a random seedNare generated for each data block. - Each data block is encrypted into
encrypted_datausing AES-256-GCM or ChaCha20-Poly1305 or SM4-GCM algorithm with keySand seedN. - To avoid the symmetric key
Sfrom being transmitted in clear text over the network, the symmetric keySis encrypted into the cipher textKwith the RSA private keyM. - The encrypted data
encrypted_data, the ciphertextK, and the random seedNare combined into an object and then written to the object storage.
Data Decryption Process
- Read the entire encrypted object (it may be a bit larger than 4MB).
- Parse the object data to get the ciphertext
K, the random seedN, and the encrypted dataencrypted_data. - Decrypt
Kwith private key to get symmetric keyS. - Decrypt the data
encrypted_databased on AES-256-GCM or ChaCha20-Poly1305 or SM4-GCM usingSandNto get the data block plaintext. - Decompress the data block.
Enable Data Encryption At Rest
Data Encryption At Rest must be enabled when creating file system. The file system that was created without Data Encryption At Rest enabled cannot enable it later.
The steps to enable Data Encryption At Rest are:
- Create a private key
- Create an encrypted file system using the private key
- Mount the file system
Step 1: Create a private key
The private key is crucial for Data Encryption At Rest and is generally manually generated using OpenSSL. The following command will generate a 2048-bit RSA private key named my-priv-key.pem in the current directory using the aes256 algorithm:
openssl genrsa -out my-priv-key.pem -aes256 2048
Since the aes256 encryption algorithm is used, the command line will require you to provide a Passphrase of at least 4 characters for this private key. You can simply think of it as a password used to encrypt the RSA private key file itself, which is also the last security safeguard for the RSA private key file.
The security of the private key is extremely important, and special attention needs to be paid to the following points:
- Passphrase Leakage Risk: If the private key's passphrase is leaked, attackers may decrypt the private key stored in the metadata engine, thereby jeopardizing the security of all encrypted data
- Private Key File Leakage: If the encrypted private key file itself is leaked along with the passphrase, it will lead to serious security risks
- Data Irrecoverability: If the correct passphrase cannot be provided to access the private key stored in the metadata engine, all encrypted data will be permanently lost and unrecoverable
It is recommended to focus on protecting the security of the passphrase and pass it through environment variables to avoid leakage in command line history.
Step 2: Create an encrypted file system
Creating an encrypted file system requires using the --encrypt-rsa-key option to specify the private key. The provided private key content will be written to the metadata engine. You need to use the environment variable JFS_RSA_PASSPHRASE to specify the private key's passphrase.
JuiceFS supports two encryption algorithm combinations, which can be specified via the --encrypt-algo option:
aes256gcm-rsa(default): Uses AES-256-GCM + RSA (or other private key)chacha20-rsa: Uses ChaCha20-Poly1305 + RSA (or other private key)sm4gcm: Uses SM4-GCM + SM2 (or other private key) Added in v1.4.0
-
Set passphrase using environment variable
export JFS_RSA_PASSPHRASE=the-passwd-for-rsa -
Create file system (using default AES-256-GCM encryption)
juicefs format --storage s3 \
  --encrypt-rsa-key my-priv-key.pem \
  ...
Or explicitly specify ChaCha20-Poly1305 encryption:
juicefs format --storage s3 \
  --encrypt-rsa-key my-priv-key.pem \
  --encrypt-algo chacha20-rsa \
... -
(Optional) Delete local private key file
JuiceFS securely stores the private key content in the metadata engine during file system formatting. Therefore, after completing file system creation (unless there are specific compliance requirements), we recommend deleting your local private key file:
rm my-priv-key.pemThis way, you only need to ensure the security of the
JFS_RSA_PASSPHRASEenvironment variable, and subsequent file system mounting and access only require providing the correct passphrase.If you need to retain the private key file due to compliance requirements or other reasons, please ensure the private key file is stored in a secure location with strict access permissions, and keep the private key file and passphrase separately.
Step 3: Mount file system
There is no need to specify extra options while mounting an encrypted file system. However, the passphrase of the private key needs to be set before mounting using environment variable.
-
Set passphrase using environment variable
export JFS_RSA_PASSPHRASE=the-passwd-for-rsa -
Mount file system
juicefs mount redis://127.0.0.1:6379/1 /mnt/myjfs
Performance Considerations
Enabling encryption does introduce some performance overhead, but modern hardware technologies have made this impact quite manageable. The specific performance impact depends on workload type, hardware configuration (particularly CPU encryption instruction set support), and data access patterns.
Modern CPUs have specialized hardware optimizations for TLS, HTTPS, and AES-256 encryption technologies. In particular, modern Intel and AMD processors include AES-NI instruction sets that can perform AES encryption operations at near-native speeds, significantly reducing the performance impact of data encryption.
Encryption Algorithm Selection Recommendations
AES-256-GCM (default choice):
- Excellent performance on modern CPUs with AES-NI instruction set support
- Widely supported and validated industry standard
- Suitable for most production environments
ChaCha20-Poly1305:
- May provide better performance on CPUs without AES-NI support
- Suitable for ARM architectures or older x86 processors
- Better resistance against timing attacks
- Preferred algorithm by companies like Google for mobile devices and certain server environments
When selecting encryption keys, we recommend using RSA-2048 keys, which provide a good balance between security strength and performance. RSA-4096 provides higher security, but its decryption operations are slower and may impact performance in high-concurrency read scenarios.
It's worth mentioning that encrypted data will be slightly larger than the original data, primarily because both AES-256-GCM and ChaCha20-Poly1305 encryption algorithms require adding authentication tags (16 bytes) and other encryption metadata.
Security Best Practices
The security of an encryption scheme depends not only on the algorithms themselves but also on how encryption keys are properly managed and used. Here are some important security practice recommendations:
Key management is at the core of security. The passphrase you set for your private key should be strong enough—we recommend using at least 16 characters with a combination of uppercase and lowercase letters, numbers, and special symbols. We recommend passing the passphrase through environment variables to avoid leakage in command line history.
While regularly rotating keys is a good practice, it's important to note that changing private keys requires reformatting the entire file system. Therefore, when planning key rotation strategies, you need to balance security requirements with business continuity.
Access control is equally important. Ensure your metadata engine (whether Redis, MySQL, or another database) is configured with appropriate authentication and authorization mechanisms. Object storage access permissions should also follow the principle of least privilege, granting only necessary operational permissions.
At the network level, try to use VPC or private networks to isolate communication traffic between the metadata engine and object storage, reducing the risk of man-in-the-middle attacks.
Monitoring and auditing can help you detect abnormal situations promptly. We recommend logging all encryption-related operations, regularly checking key usage patterns, and establishing abnormal access detection mechanisms. This way, even if a security incident occurs, you can respond quickly and take appropriate measures.
Important Considerations
When using JuiceFS encryption features, there are several important technical limitations to be aware of:
First, client-side local cached data is NOT encrypted. Although only root users or file owners can access this cached data, if your use case requires end-to-end full encryption, you'll need to consider additional protection measures, such as placing the cache directory on an encrypted file system or block storage.
Secondly, encryption functionality has some inherent limitations. File metadata (such as filenames, sizes, permissions, etc.) is not encrypted, and decrypted data exists in plaintext in memory. Most importantly, once encryption is enabled for a file system, it cannot be turned off—encryption is an irreversible operation.
In deployment planning, please consider that encryption brings additional CPU and memory overhead. To ensure optimal compatibility and stability, we recommend that all clients accessing encrypted file systems use the same or compatible versions of JuiceFS.
Usage Scenario Analysis
JuiceFS encryption features are particularly suitable for these scenarios: protecting sensitive data in cloud object storage, meeting compliance requirements such as GDPR and HIPAA, long-term secure storage of important business data, and achieving data isolation in multi-tenant environments.
However, if you need client-side local cache encryption, or want to add encryption functionality to existing file systems later, this solution may not be suitable. Similarly, for applications with extremely demanding performance requirements, or scenarios that require frequent key rotation but cannot accept reformatting, careful consideration is needed.